Four, Oh Four (JS13k 2020)
This is an overview of my entry for the JS13k competition in 2020. The aim of the competition is to build a browser-based game in under 13kb of compressed source code.
Pt 1: Theme Announcement & Project Setup
This Year's Theme
This year's theme was announced, and it's 404.
My initial thought: this is going to lend itself well to games made for gamers.
However, I aim to create something that will have a broad appeal to players of all types, not just those who would also enter this competition.
As such, my challenge is to find ways to incorporate the concept of a 404 error into my gameplay, while making the theme connect with people without inside knowledge of HTTP requests.
What ideas are tangential to 404 yet still universal?
- Being lost
- Looking for something but turning up nothing
- Answering a call
- Providing service to something else
- Having a job to do
- The numbers four and zero
There is a lot to work with, and I'm excited about how the theme will inspire me and help me narrow my vision.
Dev Environment
Overview
I'm going to focus on setting up the following tools to make my development more efficient, keep my code organized, and reduce the size of the final bundle.
- Rollup for code bundling and build plugins
- rollup-plugin-serve as a simple dev server
- rollup-plugin-livereload for live reloading on changes
- Terser for minification
- ES Lint for linting (I use
eslint:recommended) - Prettier for code formatting
I cannot stress enough how vital real-time linting and code-format-on-save are to my development workflow. Spending close to 0 time on code formatting saves numerous hours, while linting makes errors obvious before I see them at run time.
This year, I am going to experiment with not using Babel. Modern JS is much more succinct than older JS, so using modern ES syntax in the final build will save disk space in the long run. If I end up using features that aren't broadly supported yet (last 2-3 versions of Chrome / Firefox / Edge / Safari), then I may change my mind.
Setup
Installing Packages
npm install -D \\
 rollup rollup-plugin-serve rollup-plugin-livereload \\
 rollup-plugin-node-resolve rollup-plugin-terser \\
 prettier eslint eslint-config-prettier eslint-plugin-prettier
Configuring Dependencies
# rollup.config.js

import resolve from 'rollup-plugin-node-resolve';
import serve from 'rollup-plugin-serve';
import livereload from 'rollup-plugin-livereload';
import { terser } from 'rollup-plugin-terser';

export default {
  input: './src/index.js',
  output: [
 {
   file: 'build/bundle.min.js',
   format: 'iife',
   name: 'bundle',
   plugins: [terser()]
 }
  ],
  plugins: [resolve(), serve(), livereload()]
};
# .prettierrc

{
  "semi": true,
  "trailingComma": "none",
  "singleQuote": true,
  "printWidth": 80,
}
# .eslintrc.json

{
 "env": {
  "node": true,
  "browser": true,
  "es2020": true
 },
 "extends": ["eslint:recommended", "prettier"],
 "plugins": ["prettier"],
 "parserOptions": {
  "ecmaVersion": 11,
  "sourceType": "module"
 },
 "rules": {
   "prettier/prettier": "error"
 }
}
Writing a Start Command
To run the rollup server:
# c: use the config file
# w: watch files and rebuild on change
# m: use source maps (defaults to inline)
"start": "rollup -c -w -m;"
Git Hook for Compression and Bundle Size Logging
This year, I am trying out advzip, which is supposed to get another 5-10% size reduction on top of common compression libraries. Additionally, I want to set up a git hook to run my production build, including compression, during every commit. This way, I can log my project size each step of the way, and I will never be surprised by the size.
First, install advzip
brew install advancecomp
VS Code hides your project's .git folder by default, so it's helpful to modify project settings if you are using git hooks:
# .vscode/settings.json
{
 "files.exclude": {
  "**/.git": false
 }
}
Create a new file (no extension) called .git/hooks/prepare-commit-msg. To make it executable, run the following on the command line:
chmod +x .git/hooks/prepare-commit-msg
The remainder of the process for setting up the hook, as well as the source code itself, is outlined in this gist.
After setup, a nice markdown table will appear automatically during each commit outlining the project size at the various build steps:
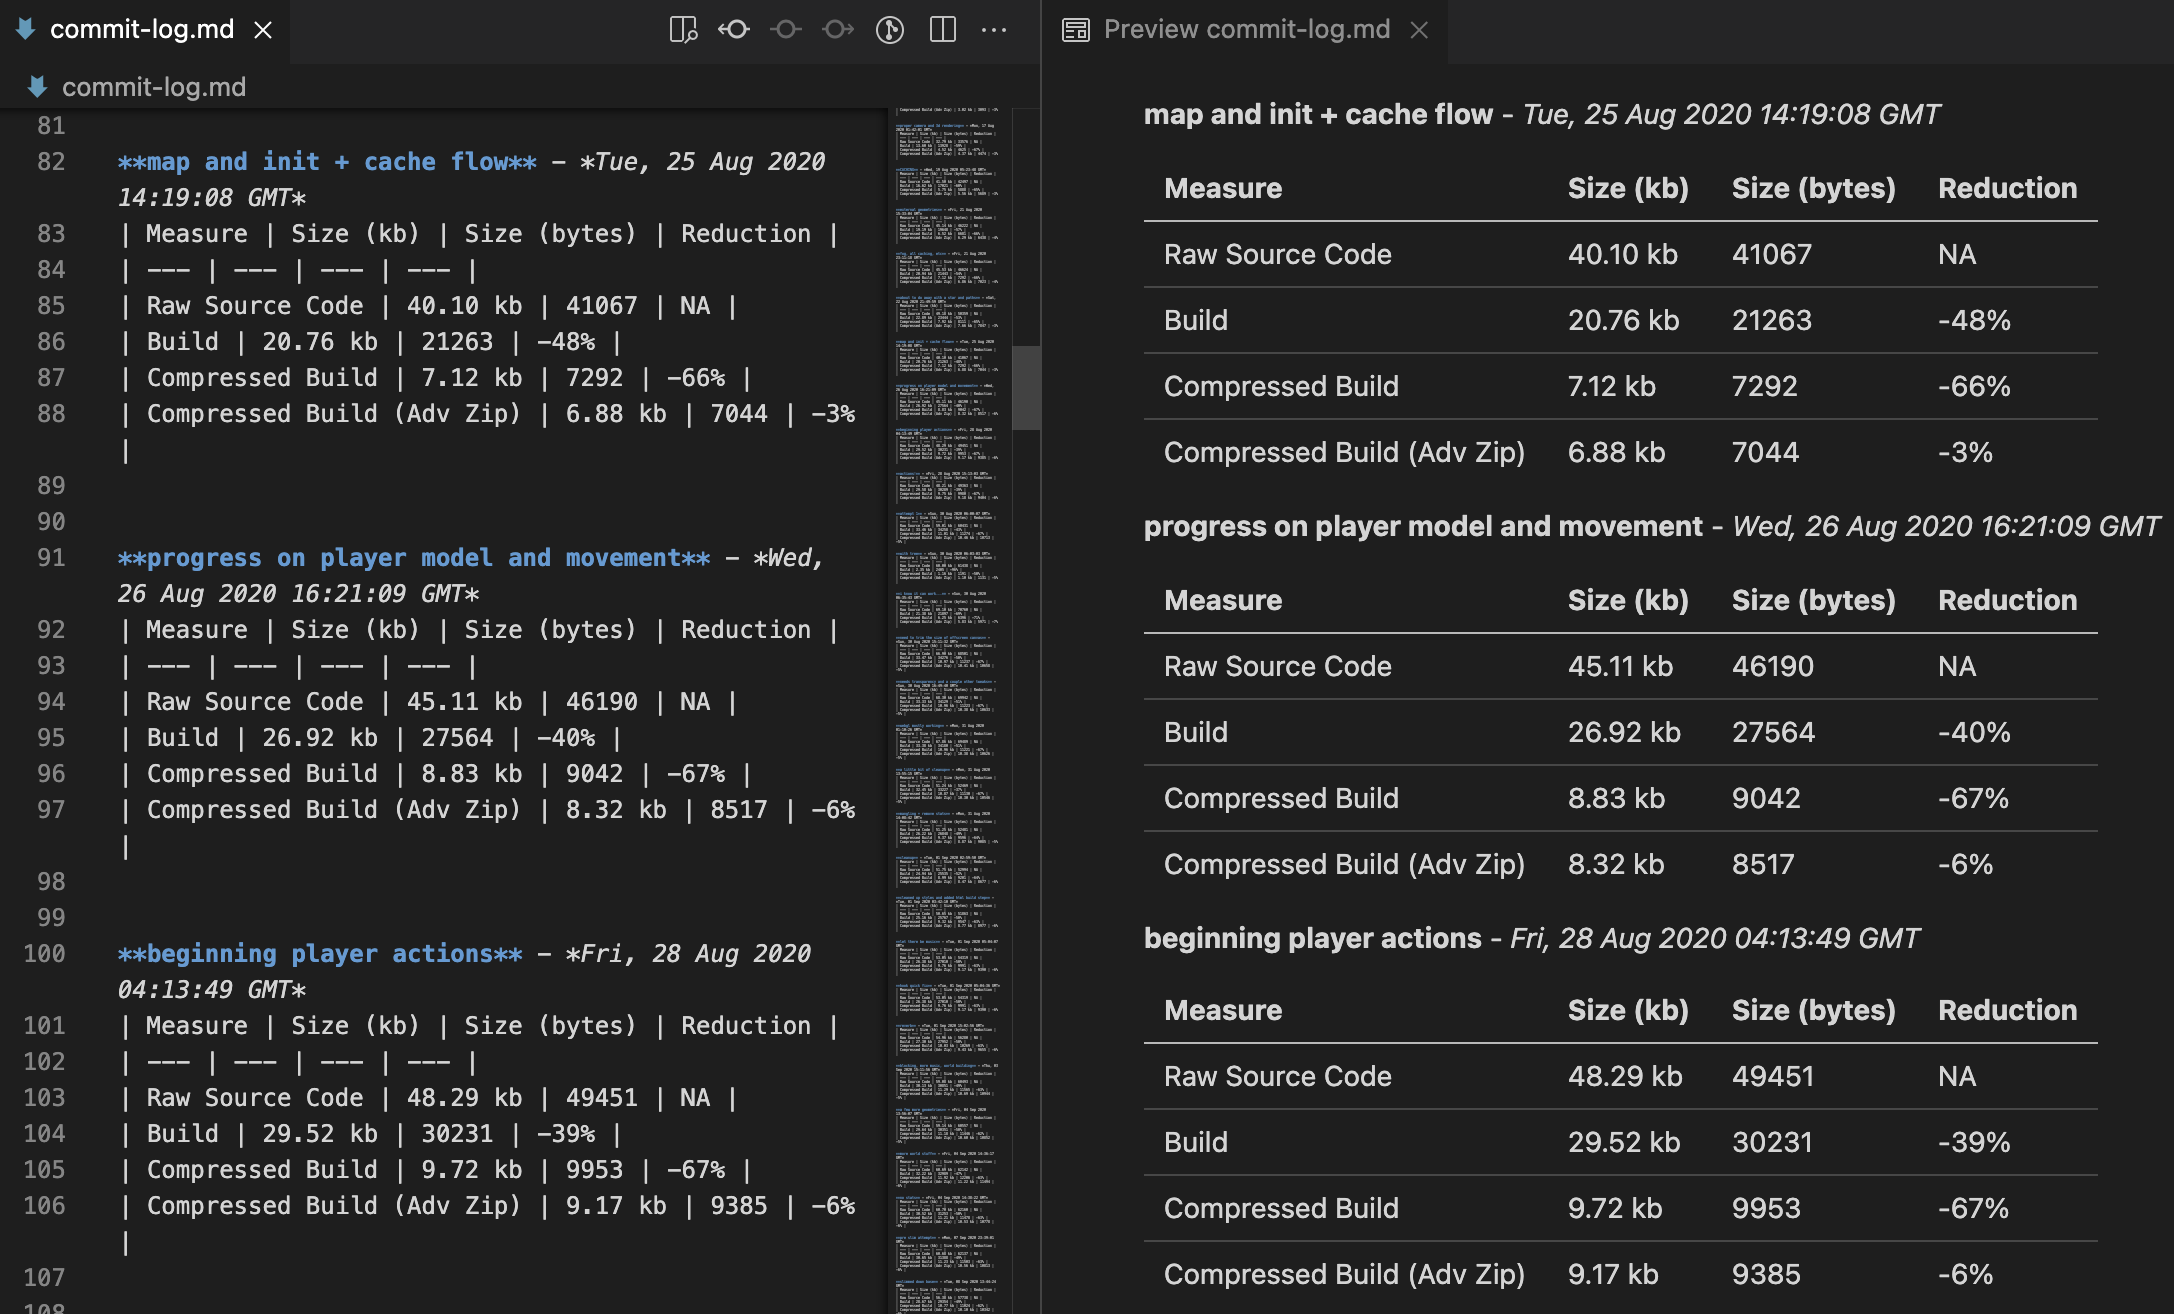
Example of an auto-generated build stats table using the custom hook
The annoying thing about this setup is that commit-log.md will be one commit behind the actual commit that it represents, because the changes to the table itself are not captured in the commit. Only the commit-msg and prepare-commit-msg hooks receive the commit message as an argument, so if you want to do anything with the message, it has to be at one of these stages. Since both of those hooks execute after the commit itself is prepared, it isn't possible to stage the changes to the commit log that are made during the prepare-commit-msg stage*.
* For the 2021 competition, I solved this problem using the pre-commit hook in Husky.
Pt 2: Writing a 3D Engine (after trying not to)
As a challenge to myself this year, I wanted to make a game that uses an axonometric projection to achieve an engaging top-down effect. As a consolation for making this reckless decision, I convinced myself that if I did it right, I could make simple conversions from "map space" to "screen space", and just run each point through a formula or two, switching back from a true top-down view, to an angled one, with ease.
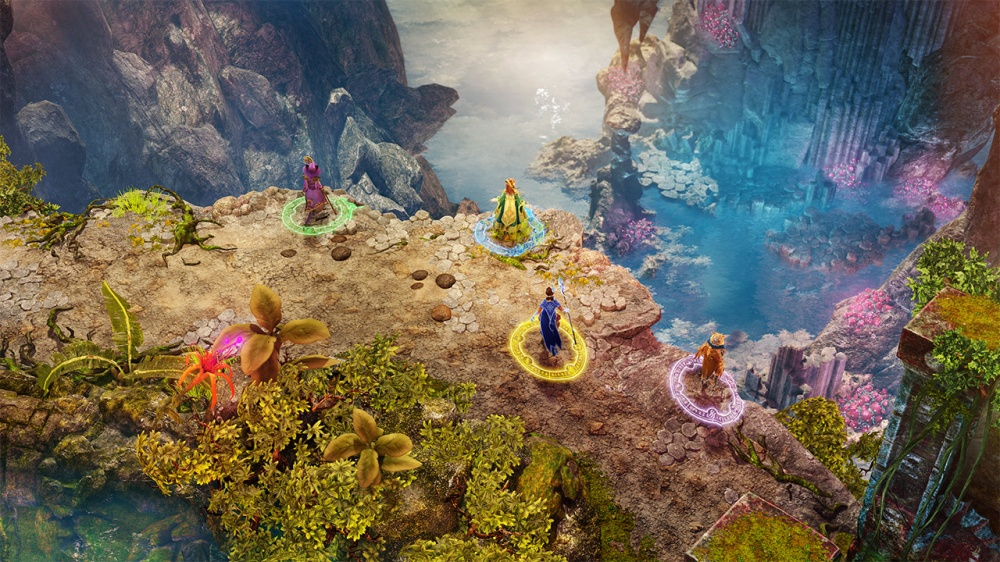
Nine Parchments has a great top-down game style that works wonders for its combat and immersive environment
The Shortcut
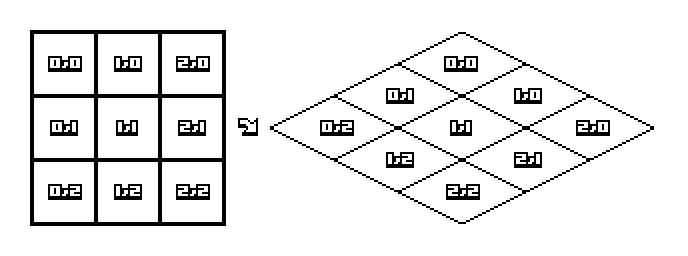
This works up to a point. I started by converting my square tiles to an axonometric projection and was indeed deceived by how simple it was. I could avoid matrix math entirely and use these formulas to achieve the effect below:
// <http://clintbellanger.net/articles/isometric_math/>
map.x = screen.x / TILE_WIDTH + screen.y / TILE_HEIGHT;
map.y = screen.y / TILE_HEIGHT - screen.x / TILE_WIDTH;
The issue is that I don't just want to make a map. I want to put stuff on it. And that stuff has a 3rd dimension. So when I started trying to place cubes on my map, it was quickly apparent that the simple math I had been using to render tiles would not suffice.
Of course, the math was only simple because I was using a single rotation of a 2d object, and then implementing a second rotation by using a shortcut that states that the width of a square becomes twice the height of a square in certain axonometric projections.
// Drawing a square isn't so hard
drawLines([
  new Vector2(0, 0),
  new Vector2(500, 0),
  new Vector2(500, 500),
  new Vector2(0, 500),
  new Vector2(0, 0)
]);

/*
The axonometric projection of a square is easy to understand intuitively.
*/
drawLines([
  new Vector2(0, 250),
  new Vector2(500, 0),
  new Vector2(1000, 250),
  new Vector2(500, 500),
  new Vector2(0, 250)
]);

But what about a cube? Can I find a simple conversion to account for the z coordinate as well? What about the character I wanted to draw? And the environment and game objects?
The short story is no, there's a reason we use matrix math to describe objects in 3D. If I had the space, I could draw and pre-render all of my art and assets to fit the isometric style, but I don't have the space for all of those sprites, given that the game must be less than 13kb. So, counter-intuitively, the most concise way to achieve what I was after was to build a basic camera and 3D renderer from scratch.
Proper Projections
An axonometric projection is just two things:
- A camera, rotated 45 degrees around the Z axis and 60 degrees around the X (or Y) axis.
- A lack of perspective, meaning that it does not take into account how far away things are
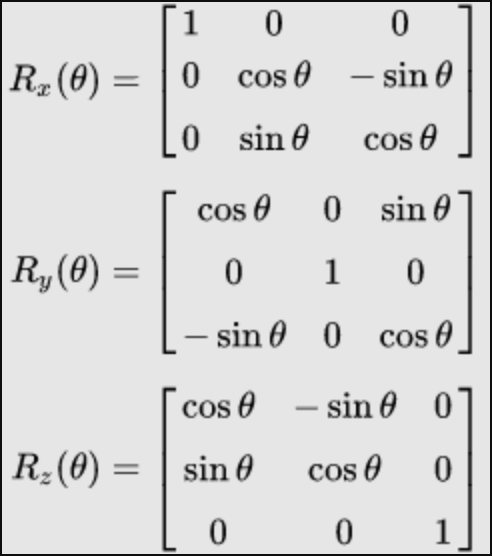
So it ended up being way more straightforward and intuitive to design my map in 3D and then perform some matrix multiplication on each point to get its projection in the camera's view. Recalling the following from linear algebra:
I made a simple camera that uses 3D rotations to calculate screen space and makes good use of volumetric projections. Here are the key components.
Rotation matrices
// Matrix is a class with a get() and transpose() method
export const Rx = new Matrix((n) => [
  [1, 0, 0],
  [0, Math.cos(n), -Math.sin(n)],
  [0, Math.sin(n), Math.cos(n)]
]);

export const Ry = new Matrix((n) => [
  [Math.cos(n), 0, Math.sin(n)],
  [0, 1, 0],
  [-Math.sin(n), 0, Math.cos(n)]
]);

export const Rz = new Matrix((n) => [
  [Math.cos(n), -Math.sin(n), 0],
  [Math.sin(n), Math.cos(n), 0],
  [0, 0, 1]
]);
3X1 matrix multiplication
export const rotate3d = (point, axis, amount, inverse) => {
  let rot;
  let xx, yy, zz;

  if (axis === 'x') {
    rot = Rx.get(amount, inverse);
  } else if (axis === 'y') {
    rot = Ry.get(amount, inverse);
  } else if (axis === 'z') {
    rot = Rz.get(amount, inverse);
  }

  rot.forEach((row, i) => {
    let total = 0;
    total += row[0] * point.x;
    total += row[1] * point.y;
    total += row[2] * point.z;

    if (i === 0) {
      xx = total;
    } else if (i === 1) {
      yy = total;
    } else {
      zz = total;
    }
  });

  point.x = xx;
  point.y = yy;
  point.z = zz;
};
Projection of a 3D point to screen space
// Method in my Camera class to perform the projection
projection(point, iso) {
 // Shift according to the position of the camera;
 point.x -= this.position.x;
 point.y -= this.position.y;
 // Apply rotations in 3 dimensions
 if (iso) {
   rotate3d(point, 'z', degToRad(45));
   rotate3d(point, 'x', degToRad(60));
 }
  // mapToScreen only uses the final x and y coordinates to place the point
  // (hence a lack of perspective)
 this.mapToScreen(point);
  }
I also implemented classes for the following, which may seem familiar to those who have used software like THREE.js:
- Vector3
- Mesh
- Group
- Geometry
These are essential items for a 3D renderer, and you can see their implementation over on Github
Since implementing a camera and 3D rendering classes, creating the world has been much more natural for me.
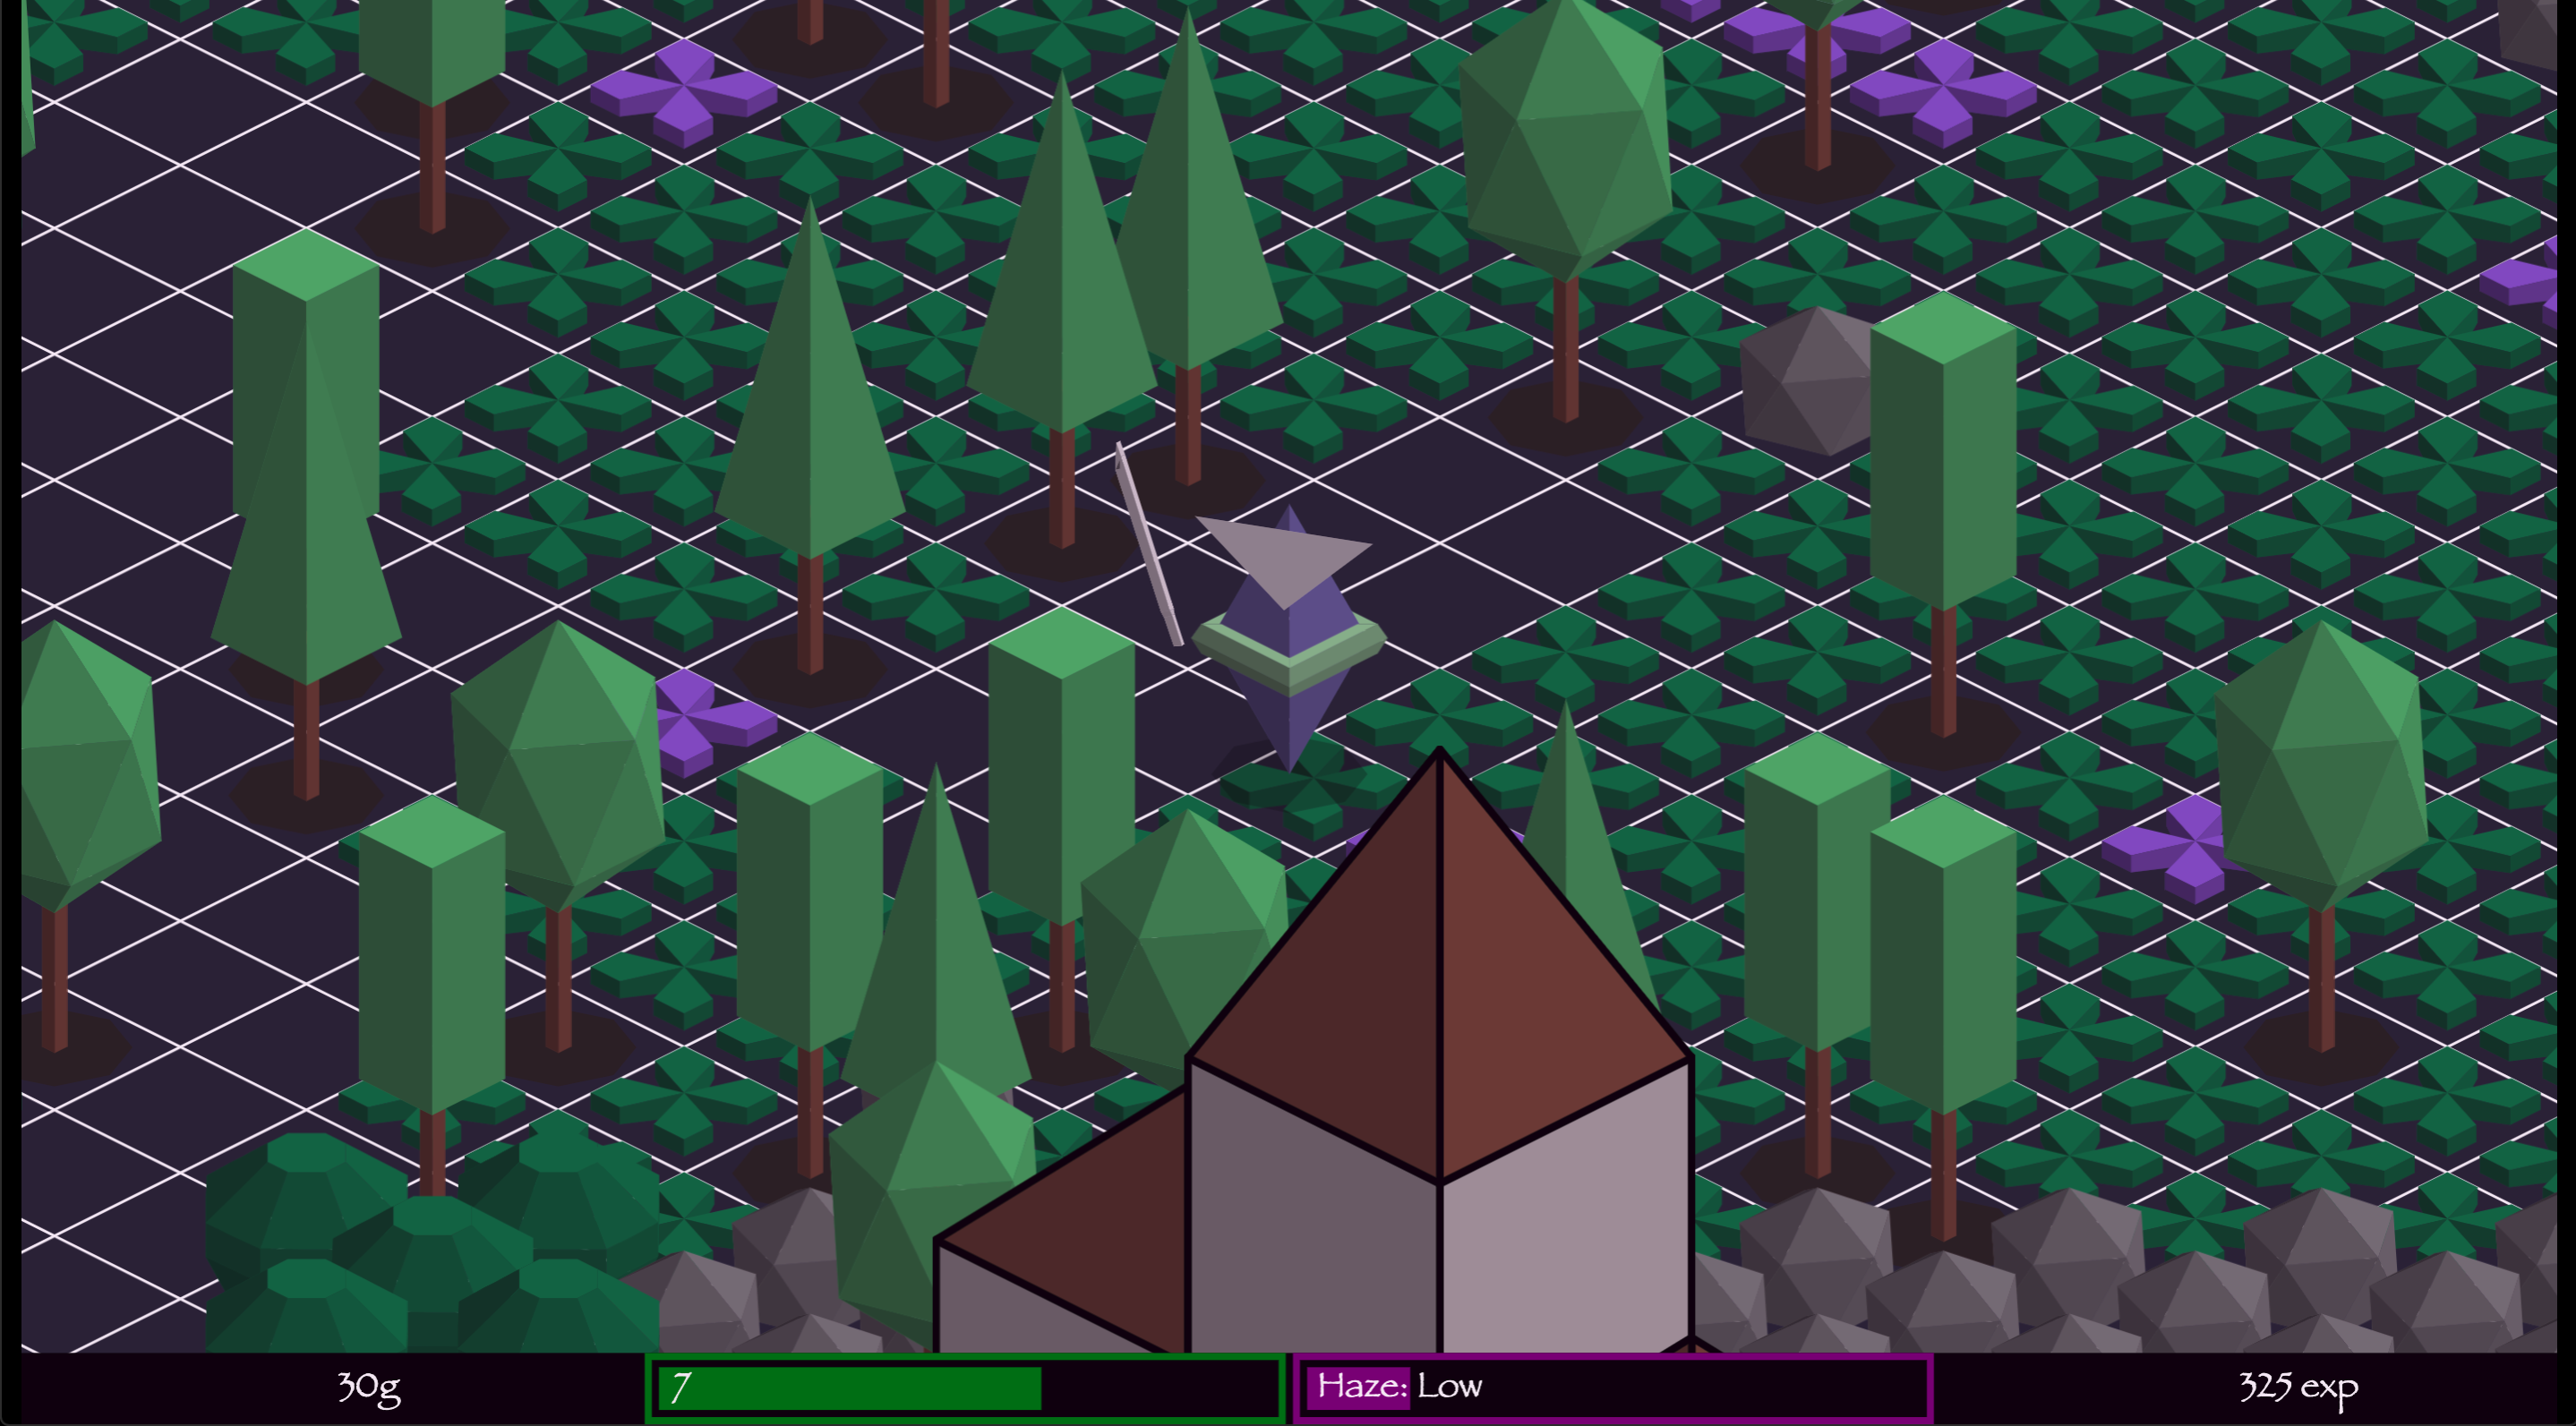
JS13k 2020 is a wrap, and I'm happy with what I learned and many of the things I built, though I missed by a mile on delivering my overall vision for my game. This last post is a quick rundown of what I thought was most notable about my final architecture, with a focus on the camera and procedurally generated bitmap caching that enables scenes like this one to be rendered at 60fps in Canvas2D contexts:
Pt 3: Using Bitmap Caching to Unlock 60fps in 3 Dimensions
Camera that caches
As background, I set a few requirements for my game at the onset, which took some creativity to meet:
- The rendering of shapes was to be done using Canvas2D, not WebGL. Otherwise, the project would quickly swell in size since the WebGL API is so verbose (also, I didn't have time to learn all that I needed to make a WebGL renderer from scratch).
- The game entities were to be designed in Blender. That way, I could quickly design and iterate using a GUI, and export objects and revisions directly to my game.
- The geometries were to be in 3 dimensions. This was just a personal challenge to myself and reflected the isometric style I was going for.
- The game was to run between 45-60 FPS. Despite the complexity in my 3-dimensional geometries, I was sure that I could still write a performant game if I could unlock the GPU acceleration behind many Canvas2D implementations.
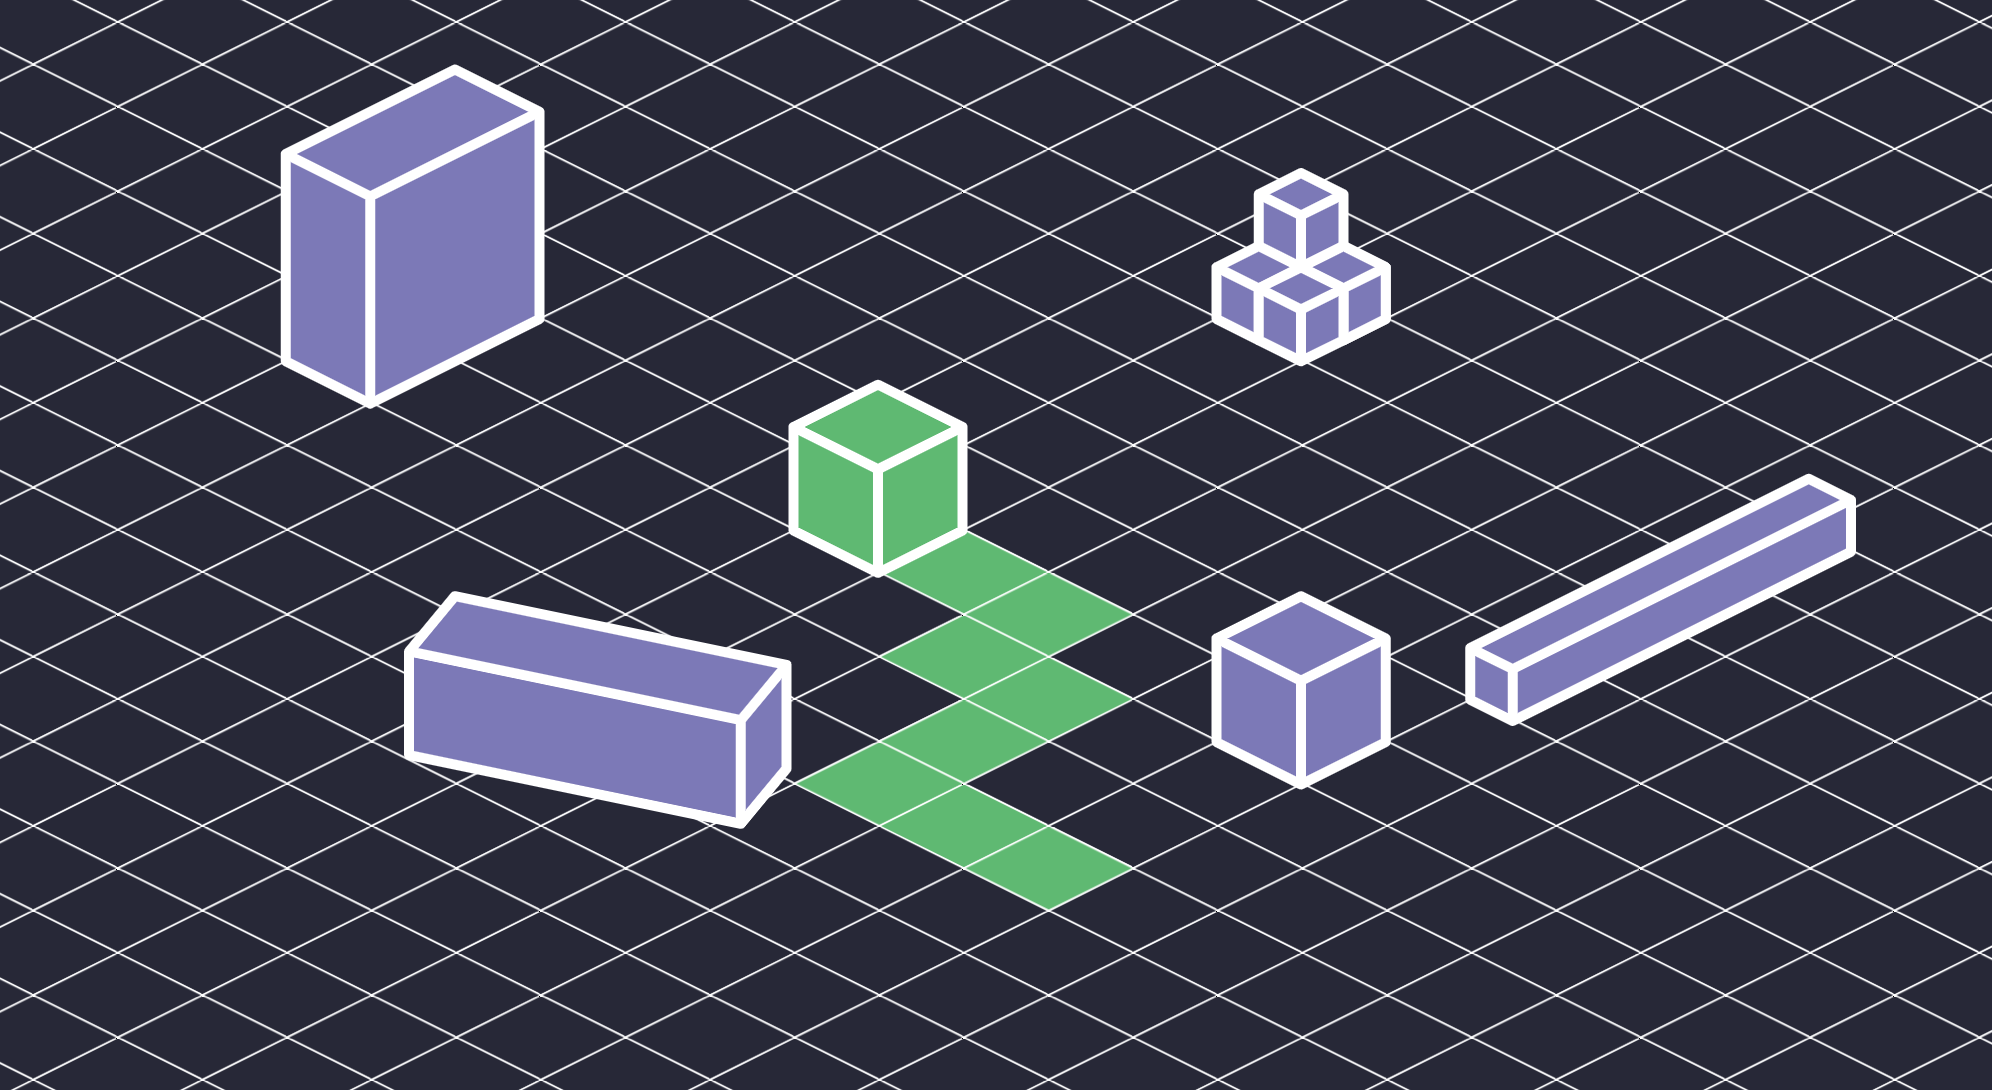
In part 2, I wrote about the construction of my 3D engine. However, in order to get it to operate well in Canvas 2D, I knew I needed to offload the vast majority of the work to the GPU. The geometries I ended up creating in Blender typically had between 6 and 17 faces, consisting of 3 to 8 vertices each. It was infeasible to have the CPU calculate the vertex position for each point during each frame.

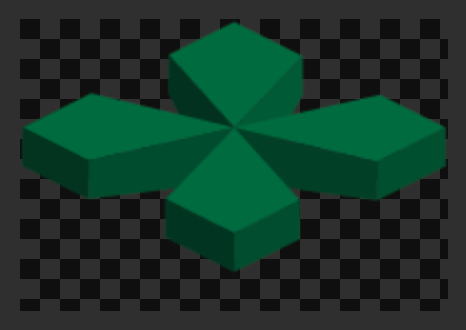
Even though it's a simple geometry, I knew I wanted a lot of this grass and would need to be clever about rendering it all.

The vertex count in my character designs added up quickly
Since the drawImage call is GPU-accelerated in all major browsers and is quite flexible in terms of what it can display, it seemed like a good alternative to moving completely to WebGL.
Ultimately, my solution for creating a performant 3D renderer in Canvas2D can be summarized as follows:
- For the first render of a given entity, project the 3D geometry to screen space, and draw the faces using 2D operations like
lineTo()andfill(). - Calculate the bounding box of the resulting drawing.
- Capture the content within the bounding box in a bitmap.
- Render the cached bitmap for all resulting frames using the GPU-accelerated
drawImage().
This approach has some limitations, mainly that it wouldn't be great for objects that rotated a lot because they would require a new bitmap image for each orientation. Similarly, unless the game scaled bitmaps up in size, risking pixelation, then it would also require new bitmap images for each size. However, for my use case, these were limitations that I could work with.
Drawing once
Before the game is played, entities are rendered and cached using an offscreen canvas. In the case of Firefox, I created a canvas element that is detached from the DOM (since the browser unfortunately does not support OffscreenCanvas). Honestly, I never noticed a difference between whether or not the canvas was truly offscreen (i.e., whether or not it used web workers). My machine was able to render and cache all ~30 or so images in a negligible amount of time.
To perform the initial render, I used a custom geometry format modeled after Blender's API. I built a Python script to save a Blender object to JSON so that I could import it into my project. It includes faces, vertices, and normals. Here's an example:
{"faces": [[0, 1, 3, 2], [2, 3, 5, 4], [3, 1, 8, 5], [6, 5, 8, 7], [7, 8, 1, 0], [9, 10, 12, 11], [11, 12, 5, 13], [12, 10, 15, 5], [4, 5, 15, 14], [14, 15, 10, 9], [16, 17, 19, 18], [18, 19, 5, 6], [19, 17, 22, 5], [20, 5, 22, 21], [21, 22, 17, 16], [23, 24, 26, 25], [25, 26, 5, 20], [26, 24, 28, 5], [13, 5, 28, 27], [27, 28, 24, 23]], "vertices": [[0.87, 0.13, 0.0], [0.87, 0.13, 0.11], [0.64, 0.13, 0.0], [0.64, 0.13, 0.11], [0.5, 0.36, 0.0], [0.5, 0.5, 0.11], [0.64, 0.5, 0.0], [0.87, 0.37, 0.0], [0.87, 0.37, 0.11], [0.13, 0.13, 0.0], [0.13, 0.13, 0.11], [0.13, 0.36, 0.0], [0.13, 0.36, 0.11], [0.36, 0.5, 0.0], [0.37, 0.13, 0.0], [0.37, 0.13, 0.11], [0.87, 0.87, 0.0], [0.87, 0.87, 0.11], [0.87, 0.64, 0.0], [0.87, 0.64, 0.11], [0.5, 0.64, 0.0], [0.63, 0.87, 0.0], [0.63, 0.87, 0.11], [0.13, 0.87, 0.0], [0.13, 0.87, 0.11], [0.36, 0.87, 0.0], [0.36, 0.87, 0.11], [0.13, 0.63, 0.0], [0.13, 0.63, 0.11]], "normals": [[-1.54, 1.57], [-2.72, 1.3], [0, 0.0], [1.15, 1.32], [-0.01, 1.57], [-3.11, 1.57], [1.99, 1.3], [0, 0.0], [-0.42, 1.32], [-1.58, 1.57], [0.03, 1.57], [-1.15, 1.3], [0, 0.0], [2.73, 1.32], [1.56, 1.57], [1.6, 1.57], [0.42, 1.3], [0, 0.0], [-1.99, 1.32], [3.13, 1.57]]}
That code would subsequently be rendered as the following bitmap by my camera.
Note that the only reason I included normals for each face was to apply shading to the faces depending on the angle to the camera. This made for a nice flat shading without having to worry about lighting or materials. I just needed one base color.
I made a couple of other optimizations as well to save precious bytes and compute time:
- Don't render faces that the camera can't see (backface culling)
- Trim the precision on the vertex coordinates to 2 decimals before exporting to save space (any less than that and the structure of the objects would become distorted)
By the end of the competition, I was pleased with how my internal API was shaping up. I had created simplified versions of functions and classes that are core to 3D libraries like THREE.js, and they were working out well for me. My syntax became quite tidy as I leaned heavily on my core classes, such as Mesh, Camera, Geometry, Group, Matrix, Styles, and Vector3.
The irony is that all of this neat 3D rendering was only performed once, for the most part, at the very beginning of the game, before it is even played. But from there, the GPU takes the wheel, and the CPU frees up for other tasks like generating audio.
https://twitter.com/markracette/status/1299164101135007744?s=20
What defines uniqueness?
To make caching work, I needed a hash/key to use as a unique identifier for a game entity. I went with the following, which creates a unique bitmap rendering for each combination of a given geometry + style + scale + rotation:
getKey() {
 const scale = this.getScale();
 const rotation = this.getRotation();
 return [
   this.geometry.name,
   this.stylesId,
   ...scale,
   ...rotation,
 ].join('~');
  }
Caching removes the need to fully render an entity if it only differs from another entity by its position. Thus, the degree to which this strategy is useful will depend not just on the complexity of the shapes but also on the number of like instances.
In my case, I wanted a rich environment that would have a lot of foliage instances, so it was well suited for this approach.
Putting it all together
Creating the map
I used a world map with some pre-designed tiles and others procedurally generated. My game only rendered the tiles that were visible to the camera in the current frame. And unless it was the very first render, then the camera loaded up a cached bitmap image and called drawImage().
There are a couple of exceptions to this (such as the player's face and machete, which rotate often, as well as the animations created when swinging at the grass... those were all rendered each frame by Canvas2D paths to avoid making a ton of bitmap images and overloading the browser's memory).
Measuring bounding boxes
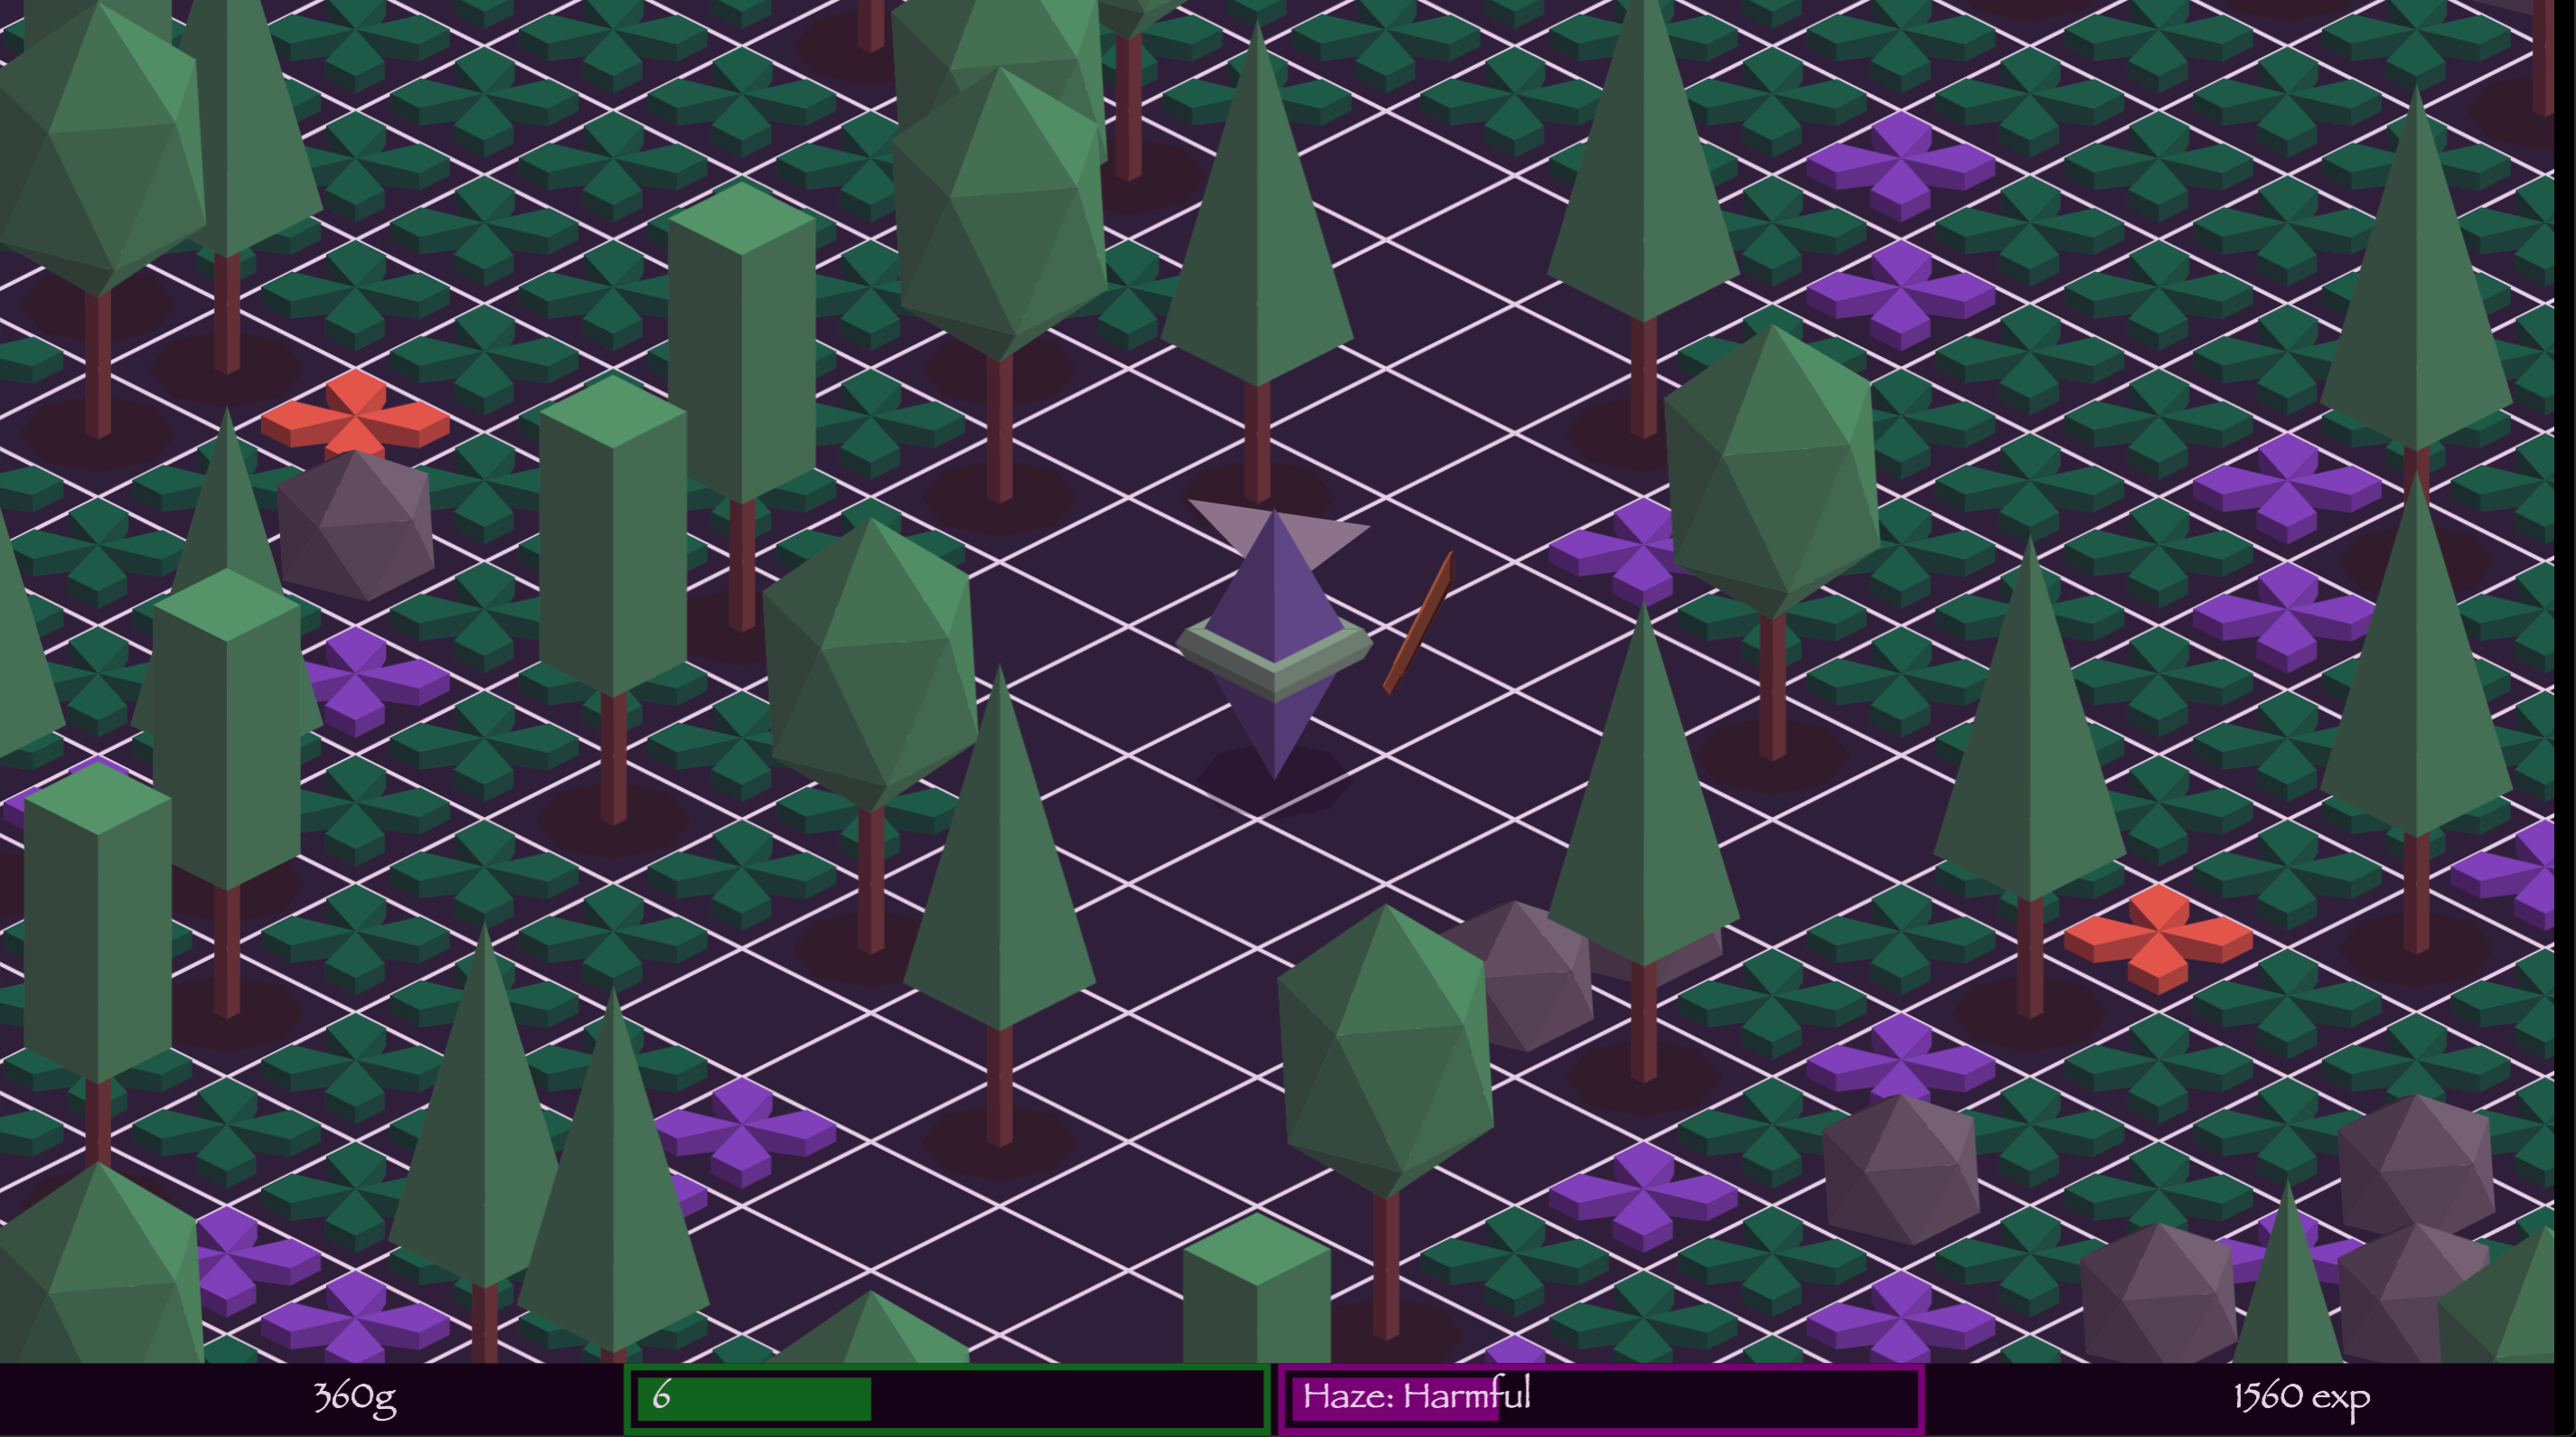
There were also some challenges with tracking the bounding box associated with each bitmap image and then finding the screen pixels to render the image in. The key was to add the strokeWidth to the bounding box itself, and to account for an entity's vertical position relative to the tile it was in. If you're curious about that, it's best to check out the source.
In short, this is how - using a bunch of small transparent images, I was able to make a cohesive environment like the one seen below. There was one huge unforeseen problem with this approach, outlined in the next section, but overall, I was pleased with it, and I would consider using the same architecture for a future game. My only regret is that this rendering technique consumed so much of my available time during the competition and didn't allow me to focus on the gameplay or the game mechanics.
One major pitfall (Firefox - I'm looking at you)
Unfortunately, I got struck by this Firefox bug, which makes drawImage() extremely slow on specific versions of Mac OSX. I wrestled for a long time about what to do. I ultimately wasted about a week of the competition writing a WebGL drawImage() implementation, which can be found in its entirety here.
The problem with this was twofold:
First, it took up a ton of space in my project. I don't know how many bytes it was compressed and minified, but when I finally ended up deleting it, I felt like I could breathe again. Doing so ultimately gave me space to focus on audio and gameplay.
Second, using WebGL to draw images made it hard to mix WebGL and Canvas2D content. I needed to create 3 canvas layers on top of each other: 1) a "background" WebGL canvas, which would draw images that sat 2) a Canvas2D "middle" layer for animations and my player, and 3) a "foreground" WebGL canvas, that would display anything that had to overlap with my player and be displayed in front of it. Also, since WebGL images need to be rendered as textures, and textures "belong" to the context that they were created in, I would have to double my image cache to draw the same objects across the foreground and the background. This was a huge pain, and managing that many canvas contexts also cost me a lot of space.
It would have made more sense to go all in on WebGL rather than going this route.
It wasn't worth allocating any of my precious 13kb to address performance on a specific OS + browser combination. Ultimately, this was a really frustrating experience, and it highlighted the two things I find most difficult about developing out-of-the-box experiences on the web: browser implementations and performance issues.
I love being able to hack together and publish a game in a matter of days, and be a member of a community like JS13k. At the same time, this particular limitation made it clear to me that I need to tone down my ambitions for next year and rely on more tried-and-true rendering techniques.
Getting it to 13kb
Meeting the size limitation wasn't a huge challenge for me, though at times it was daunting.
Once I got my build set up, it was more of a mental exercise to understand in real time what sorts of things would impact my final, compressed bundle size (not necessarily the size of my source code). Specially, I had to remind myself that:
- Variable names should be as long and informative as they need to be. As long as you are using a capable mangler, like Terser, all variables will be shortened to one or two letters anyway.
- Browser APIs cannot be mangled, so using something like
document.getElementById()will end up the same size in your minified bundle. As a result, it's a good idea to minimize the number of unique APIs in use. Same with string literals, as they will not be mangled either. - Compression relies on replacing redundant bytes, so even though it will affect your bundle size to introduce a painful API call like
node.linearRampToValueAtTime(), once it's done, it's done. You should not worry so much about subsequent uses. Sufficiently advanced zip techniques will replace all of those occurrences with something much smaller at build time in a similar way to how Terser will mangle variable names in the first place.
That's a wrap
Thanks for reading! You can play my JS13k entry herehttps://js13kgames.com/entries/four-oh-four, and you can find the final source code on Githubhttps://github.com/mracette/js13k-2020.
Outcome
Ranking
- Overall: 65 / 227
- Audio: 10 / 227
A significant improvement from my #126 ranking last year, but still a ways to go. Ultimately, my game was technically impressive but not very fun. Plus, I got a lot of feedback that the dialogue at the beginning went on for too long and needed a skip button. That's fair.
However, I did place in the top 10 for the audio category, which was a pleasant surprise.
For next year, I'll tone down the technical complexity and focus on gameplay.